Hey guys,
I hope you are all having a great Saturday so far, I am still feeling ill!!
But this is going to be my long overdue water marble nail tutorial.
Firstly I would just like to say, this is how I do my nails and lots of other people do it differently, but I have taught myself and this is my method of water marbling.
So what you are going to need is water, the best kind that I have found is bottled or filtered water, tap does work but just not as well.
The water has to be room temperature for the marbling to work, I keep a bottle of filter water in with my nail kits,
The cups I use are just cheap plastic cups that you can get anywhere, I find these easier as I can just through them away when I have finished.
The next step with water marbling is preparation, you have to have everything ready that you will need, because once you start it's awkward to find things, plus you only have a very quick amount of time to work with the nail varnish in the water.
So more things that you need are, cotton buds, cocktail sticks, tape, scissors and nail varnish remover,
So once you have everything you need, you need to paint your nails a base coat, this can just be a clear one, but I think it works better with a black or white base coat.
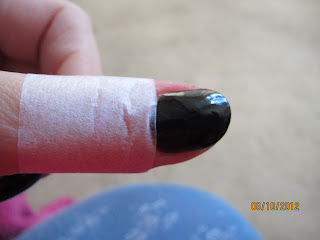
Once this has dried well, then you can begin the taping, I use a first aid tape that is about 50p in most supermarkets and is very easy to apply and remove.
Now I use 2 bits of tape for each finger/thumb,
There will still be some mess, but it will be a lot easier to clean up afterwards.
Once this is done then we can move onto nail varnish colours, with this my advice is practise, not all brands of nail varnish work, and some brands do not work together, so play around with what you have to find the best ones that work.
Once you have decided make sure that all the pots are ready with the tops loose so you can work quickly, as the nail varnish will get a skin on pretty quickly once in the water.
This is easier to judge as you do more marbling.
Once you have added your colours, you are then going to get your cocktail stick and very lightly(you only want to gently touch the surface)start making a pattern.
This is done however you want, but as I didcovered it does take practice.
Once you have the pattern you want, you then want to dip your finger into the water.
You are going to do it nail bed flush with the pattern that you want to transfer onto your nail.
Once you have done this you need to plunge your nail down further into the water, and using the cotton buds, you need to take away any excess nail varnish left floating around the water, if you don't do this as you remove your finger the excess varnish sticks to the nail.
You then need to leave them to dry a bit before removing the tape, and then repeat with all fingers.
Once this is done you then want to top coat them all, and your ready to go.
I hope this tutorial has helped you, and remember it takes lots of practise and can get messy in the beginning, but once you have the hang of it, it is such a pretty style to have on your nails.
Speak to you all soon. X


No comments:
Post a Comment